Building a Virtual Cisco Network Lab with Containerlab
So you want a real Cisco lab running on your laptop or a small Linux box — no physical hardware, no expensive CML server license, just containers. This post walks through exactly that: installing Containerlab, building Docker images from Cisco IOL binaries using vrnetlab, defining a multi-node topology, and finally pushing configuration to every device automatically from AWX.
By the end you will have two routers and two switches wired up, OSPF converged, VLANs pushed, and L2/L3 interfaces configured — all from Ansible playbooks running in AWX.
What We Are Building
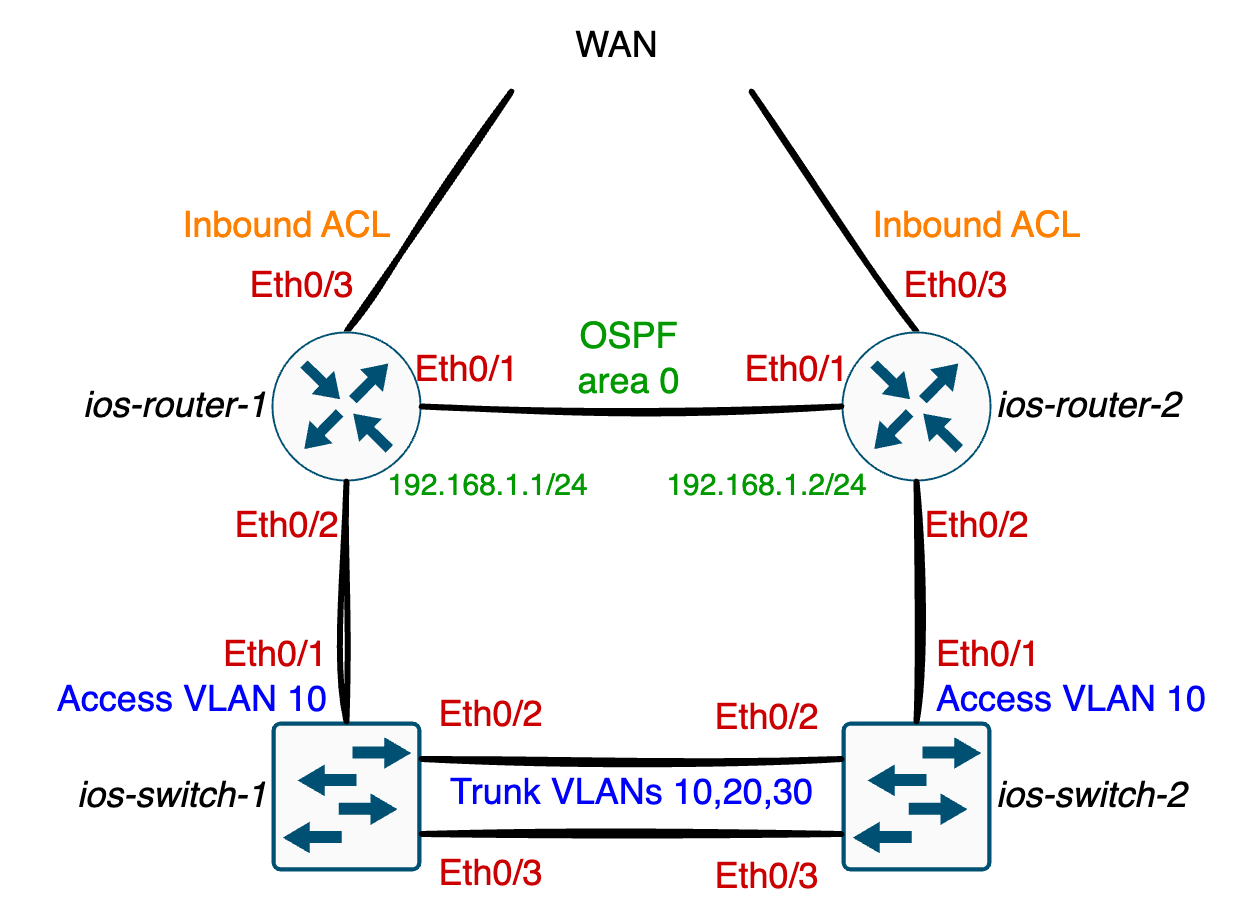
Two IOL routers peering over OSPF, each connected down to an IOL-L2 switch, the switches inter-connected with two trunk links.
An AWX instance reachable from the lab host (optional but covered at the end)
Step 1 — Install Containerlab
Containerlab provides a single install script that handles everything: the binary, bash completion, and an optional setup for Docker if it is not already present.
Containerlab does not ship Cisco images — you bring your own from a CML subscription. The srl-labs/vrnetlab fork packages those binaries into Docker images that Containerlab knows how to manage.
⚠️ Important: Use srl-labs/vrnetlab, not the upstream vrnetlab/vrnetlab. They are not compatible with Containerlab.
Clone the repo
git clone https://github.com/srl-labs/vrnetlab.git
cd vrnetlab/cisco/iol
Rename and place your images
The Makefile discovers images by filename pattern. Follow the convention exactly:
IOL (IOS on Linux) runs as a native Linux binary inside the container — no QEMU, no KVM, no nested virtualisation required. It is lighter, faster to boot, and easier to run at scale compared to vIOS qcow2 images.
Step 3 — Generate the IOL License File
IOL will silently exit without a valid iourc license keyed to your hostname. Generate one:
Create a working directory and write the topology file:
mkdir -p ~/clab/site-a &&cd ~/clab/site-a
# site-a.clab.ymlname:site-atopology:defaults:binds:- /home/ubuntu/iourc:/opt/iourc:ronodes:ios-router-1:kind:cisco_iolimage:vrnetlab/cisco_iol:17.16.01aios-router-2:kind:cisco_iolimage:vrnetlab/cisco_iol:17.16.01aios-switch-1:kind:cisco_iolimage:vrnetlab/cisco_iol:L2-17.16.01atype:L2ios-switch-2:kind:cisco_iolimage:vrnetlab/cisco_iol:L2-17.16.01atype:L2links:# Router-to-router (OSPF area 0)- endpoints:["ios-router-1:Ethernet0/1","ios-router-2:Ethernet0/1"]# Router-1 down to Switch-1- endpoints:["ios-router-1:Ethernet0/2","ios-switch-1:Ethernet0/1"]# Router-2 down to Switch-2- endpoints:["ios-router-2:Ethernet0/2","ios-switch-2:Ethernet0/1"]# Switch-to-switch trunk (two parallel links)- endpoints:["ios-switch-1:Ethernet0/2","ios-switch-2:Ethernet0/2"]- endpoints:["ios-switch-1:Ethernet0/3","ios-switch-2:Ethernet0/3"]
A few things worth noting:
The binds under defaults mounts the license file into every node automatically.
type: L2 on the switch nodes tells Containerlab to apply an L2-appropriate startup config — without it, STP and VLAN features will not work correctly.
IOL interfaces use the EthernetX/Y naming convention, grouped in sets of 4 per slot.
The management network 172.20.20.0/24 is a Docker bridge local to the Containerlab host. To let AWX (running on a different machine or container) reach the nodes, add a static route on the AWX host pointing to the Containerlab host:
# Run this on the AWX hostsudo ip route add 172.20.20.0/24 via <containerlab-host-ip>
Run them from AWX as individual Job Templates, or chain them in a Workflow Template in this order:
l3-interfaces → ospf (routers)
ensure-vlans → l2-interfaces (switches)
Verification
After all playbooks complete:
# On ios-router-1show ip ospf neighbor
show ip interface brief
show ip route
# On ios-switch-1show vlan brief
show interfaces trunk
show spanning-tree summary